Menu
Physics Lesson 16.8.1 - Lentz Law
Please provide a rating, it takes seconds and helps us to keep this resource free for all to use
Welcome to our Physics lesson on Lentz Law, this is the first lesson of our suite of physics lessons covering the topic of Lentz Law, you can find links to the other lessons within this tutorial and access additional physics learning resources below this lesson.
Lentz Law
In the previous tutorial, we explained the Faraday's Law, which expresses the induced emf as a rate of flux change. The mathematical expression of Faraday's Law is
The minus sign in Faraday's law of induction is very important. The negative sign means that the induced emf creates a current (induced current) and magnetic field (induced magnetic field) that oppose the change in flux. This statement is known as the Lenz's Law .
It is not very common in Physics that a minus placed in the formula of a certain law (here Faraday's Law) produces another law (Lentz Law). This means the direction of the induced emf in a coil is very important. Faraday was aware of the direction, but Lenz stated it explicitly, so he is credited for its discovery.
When we move a magnet towards to or away from a coil, we must consider two magnetic fields: one is the magnetic field B possessed by the magnet and the other is a new magnetic field produced in the coil due to the presence of the induced current. This new magnetic field is known as the induced magnetic field Bi and it can be in the same or opposite direction of the original magnetic field produced by the moving magnet.
We can think this phenomenon similar to when we walk near a dog as mentioned in the beginning of this tutorial. If we assault the dog, it will rush against us but if we try to avoid the dog, the chance to be unharmed by the end of this situation increases.
The strategy used to solve problems involving the Lentz Law consists on the following steps:
- Making a sketch that helps is a better understanding of situation through visualization.
- Determining the direction of the magnetic field B.
- Determining whether the flux is increasing or decreasing.
- Determining the direction of the induced magnetic field Bi. It is either added to or subtracted from the original field, depending on how the magnet is moving or which pole is near the loop. However, one thing is sure: it always opposes the motion.
- Using the Right Hand Rule to determine the direction of the induced current that is responsible for the induced magnetic field Bi.
- The direction (or polarity) of the induced emf will now drive a current in this direction and can be thought as current emerging from the positive terminal of the emf and returning to its negative terminal.
Let's consider an example to make this point clear. If a magnet is moving towards a coil as shown in the figure,
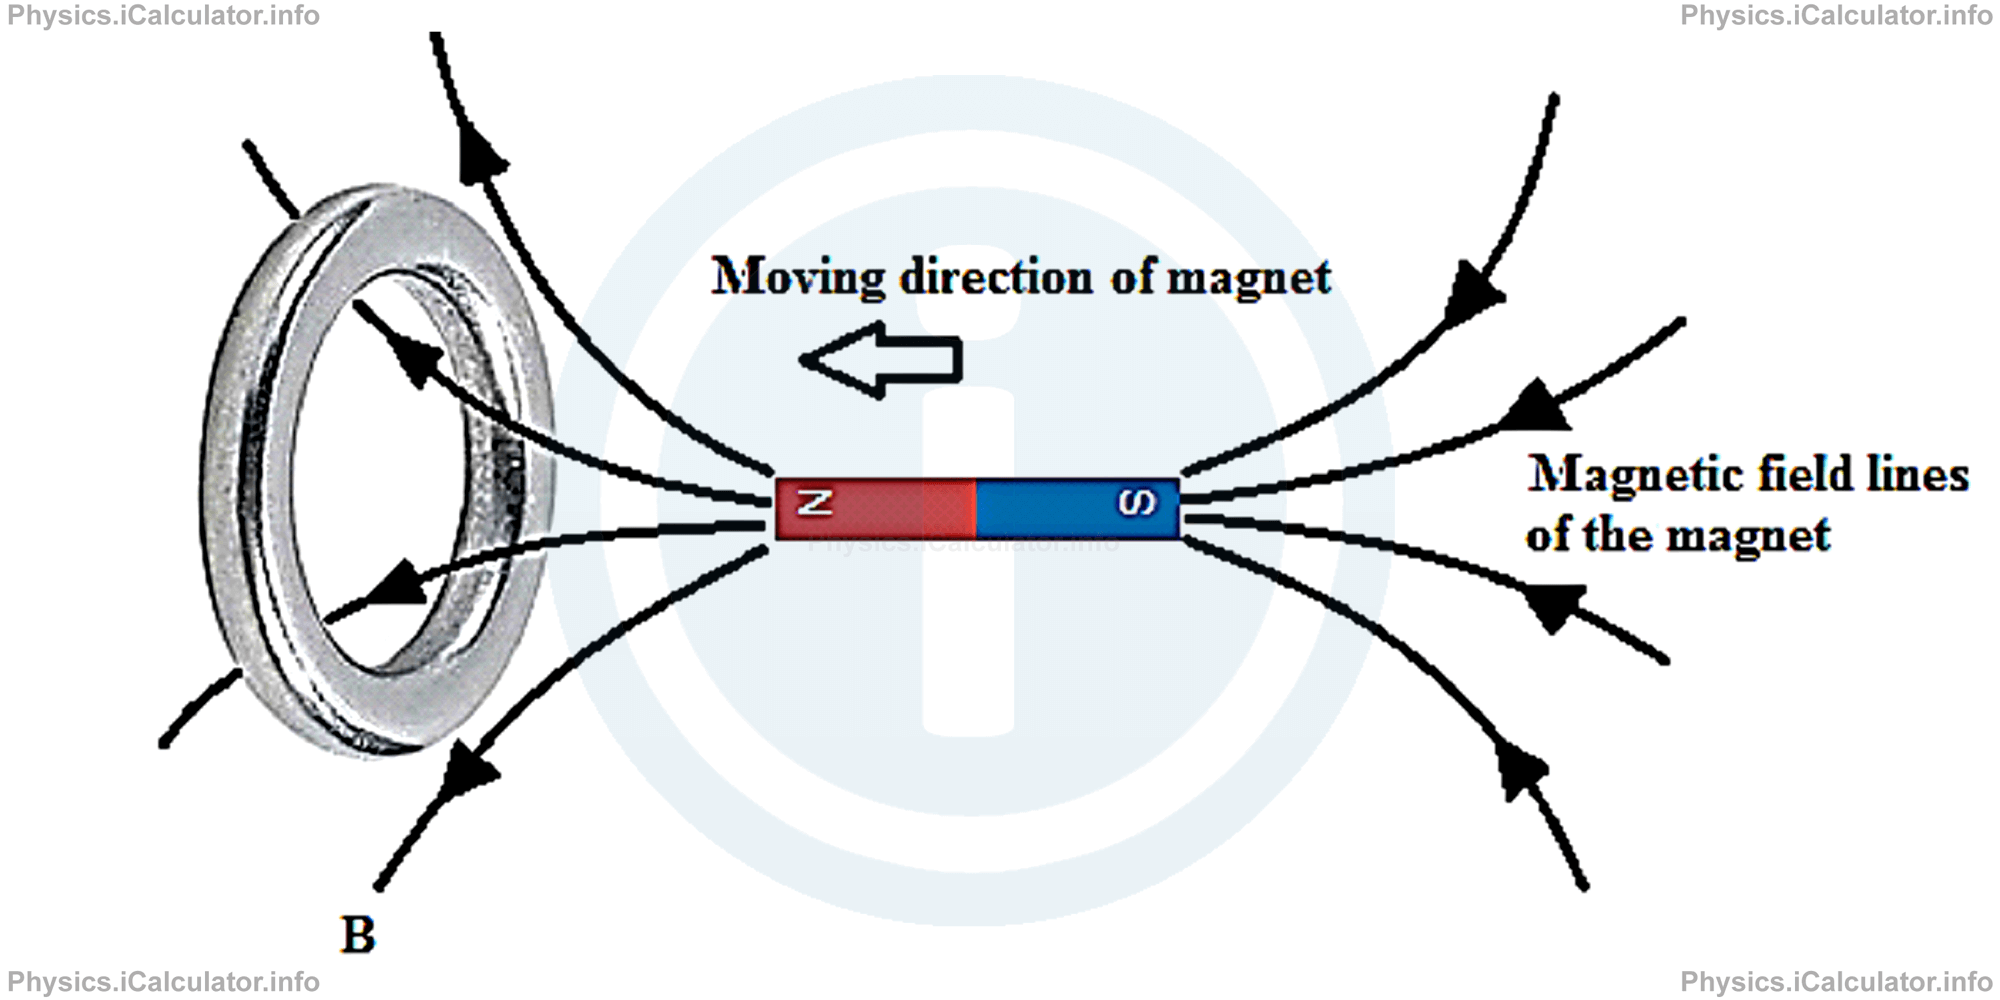
a new magnetic field is generated because of the current induced in the coil as a result of magnet's motion. This induced magnetic field Bi opposes the magnet's motion and if considered the above figure, the direction if the induced magnetic field is as shown below:
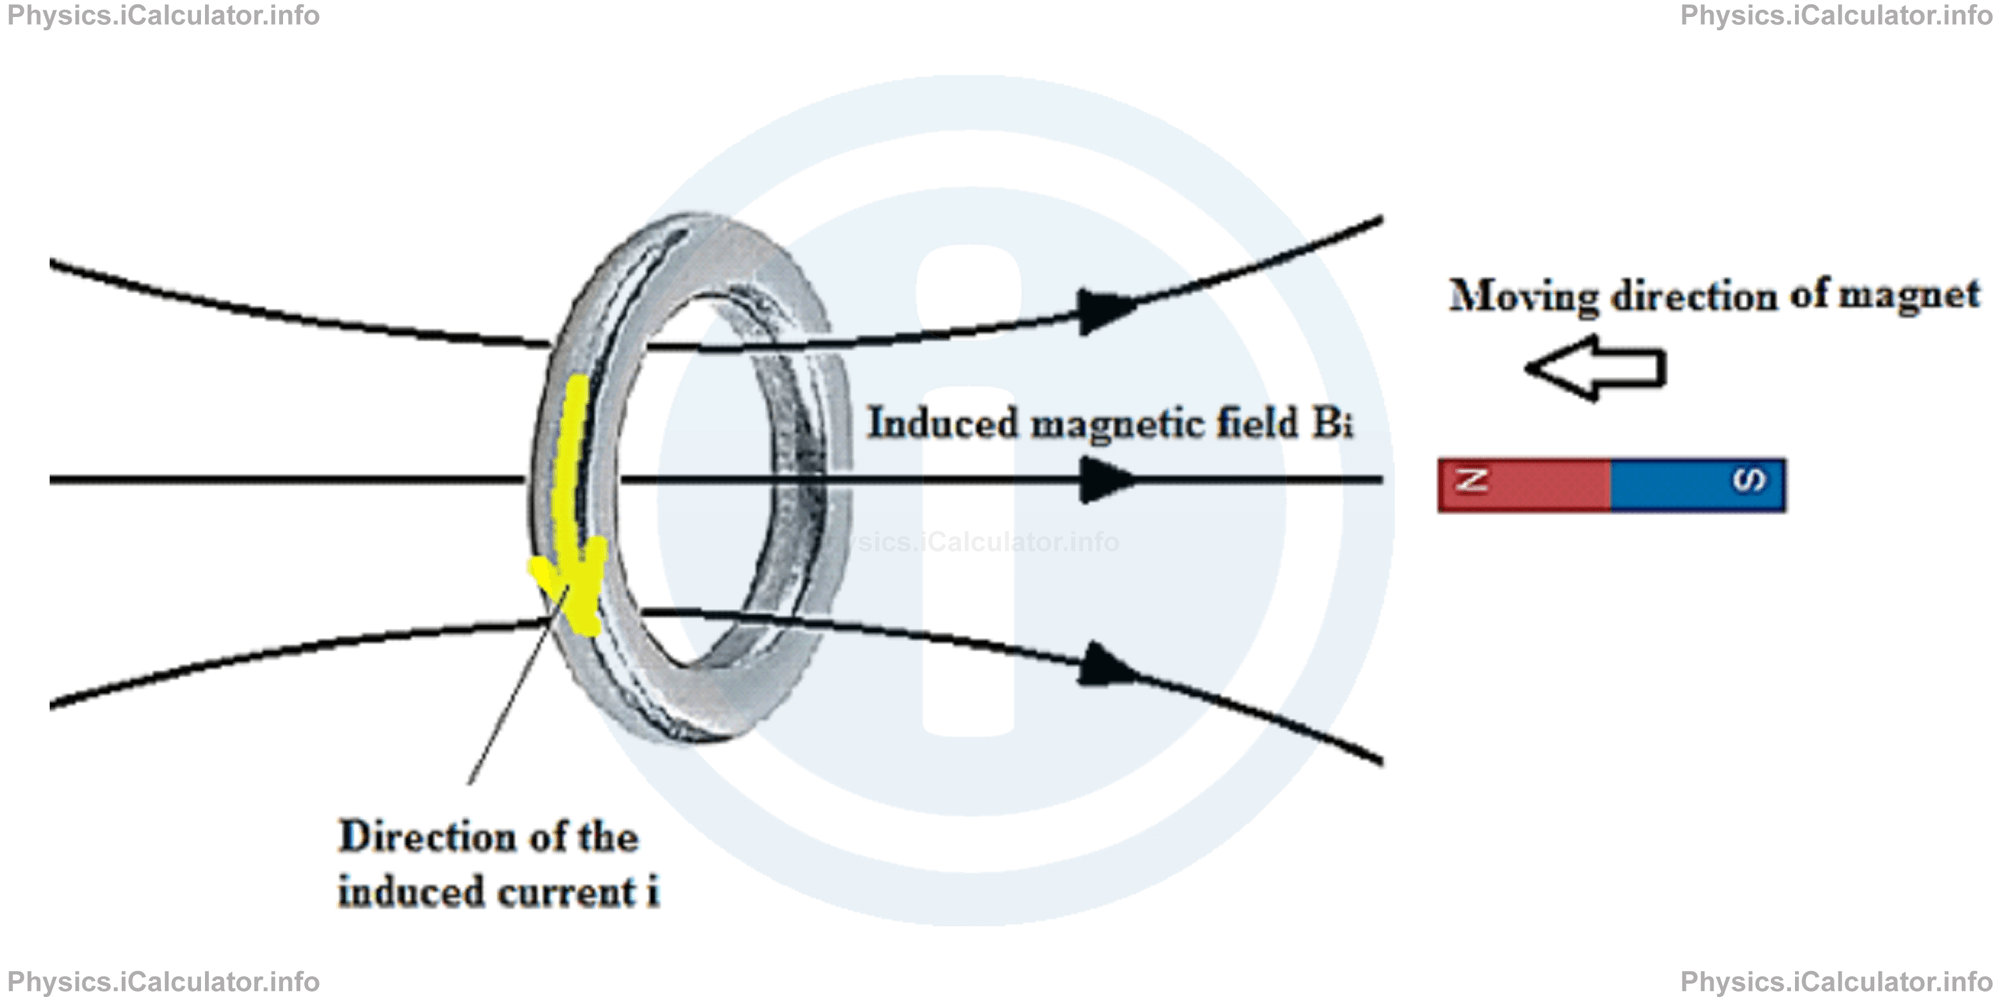
Since an induced current is produced due to the magnet's motion relative to the coil, an emf is induced in the coil as well. Therefore, the magnetic flux in the coil changes based on the Faraday's Law:
If the magnet moves in the direction shown in the figure (towards the coil), the magnetic flux increases because more magnetic field lines enter the coil. This is obvious from geometry as when we move the magnet closer to the coil, the angle formed by the magnetic pole and the coil increases and as a result, more field lines enter the coil. As a result, the total magnetic field produced is
where B is the original magnetic field produced by the magnet and Bi is the induced magnetic field produced when the magnet moves towards the coil.
When the magnet moves in the opposite direction, the magnetic field of magnet is still in the original direction as the magnet only displaces horizontally; its poles does not change direction. However, an induced magnetic field in the opposite direction will be produced due to the induced current and emf of the coil. They also change direction to the previous case and thus, we obtain the setup shown in the figures below:
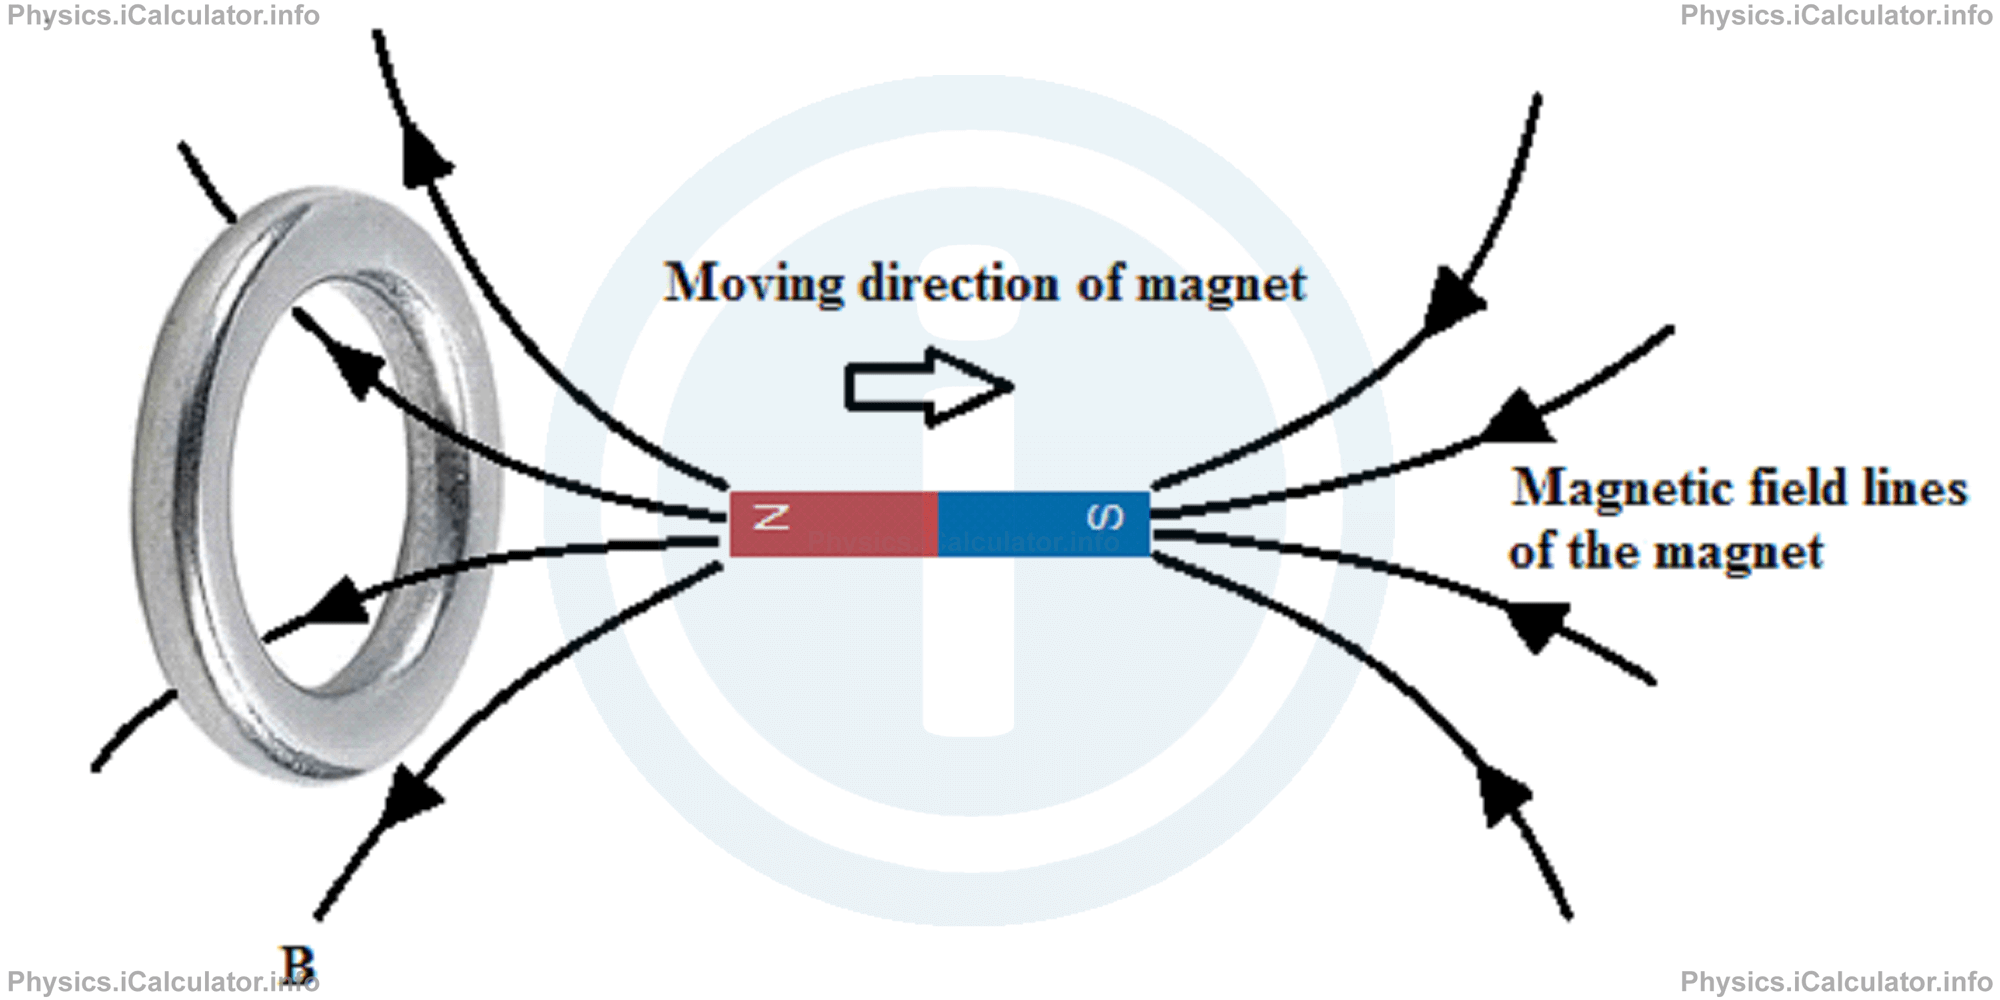
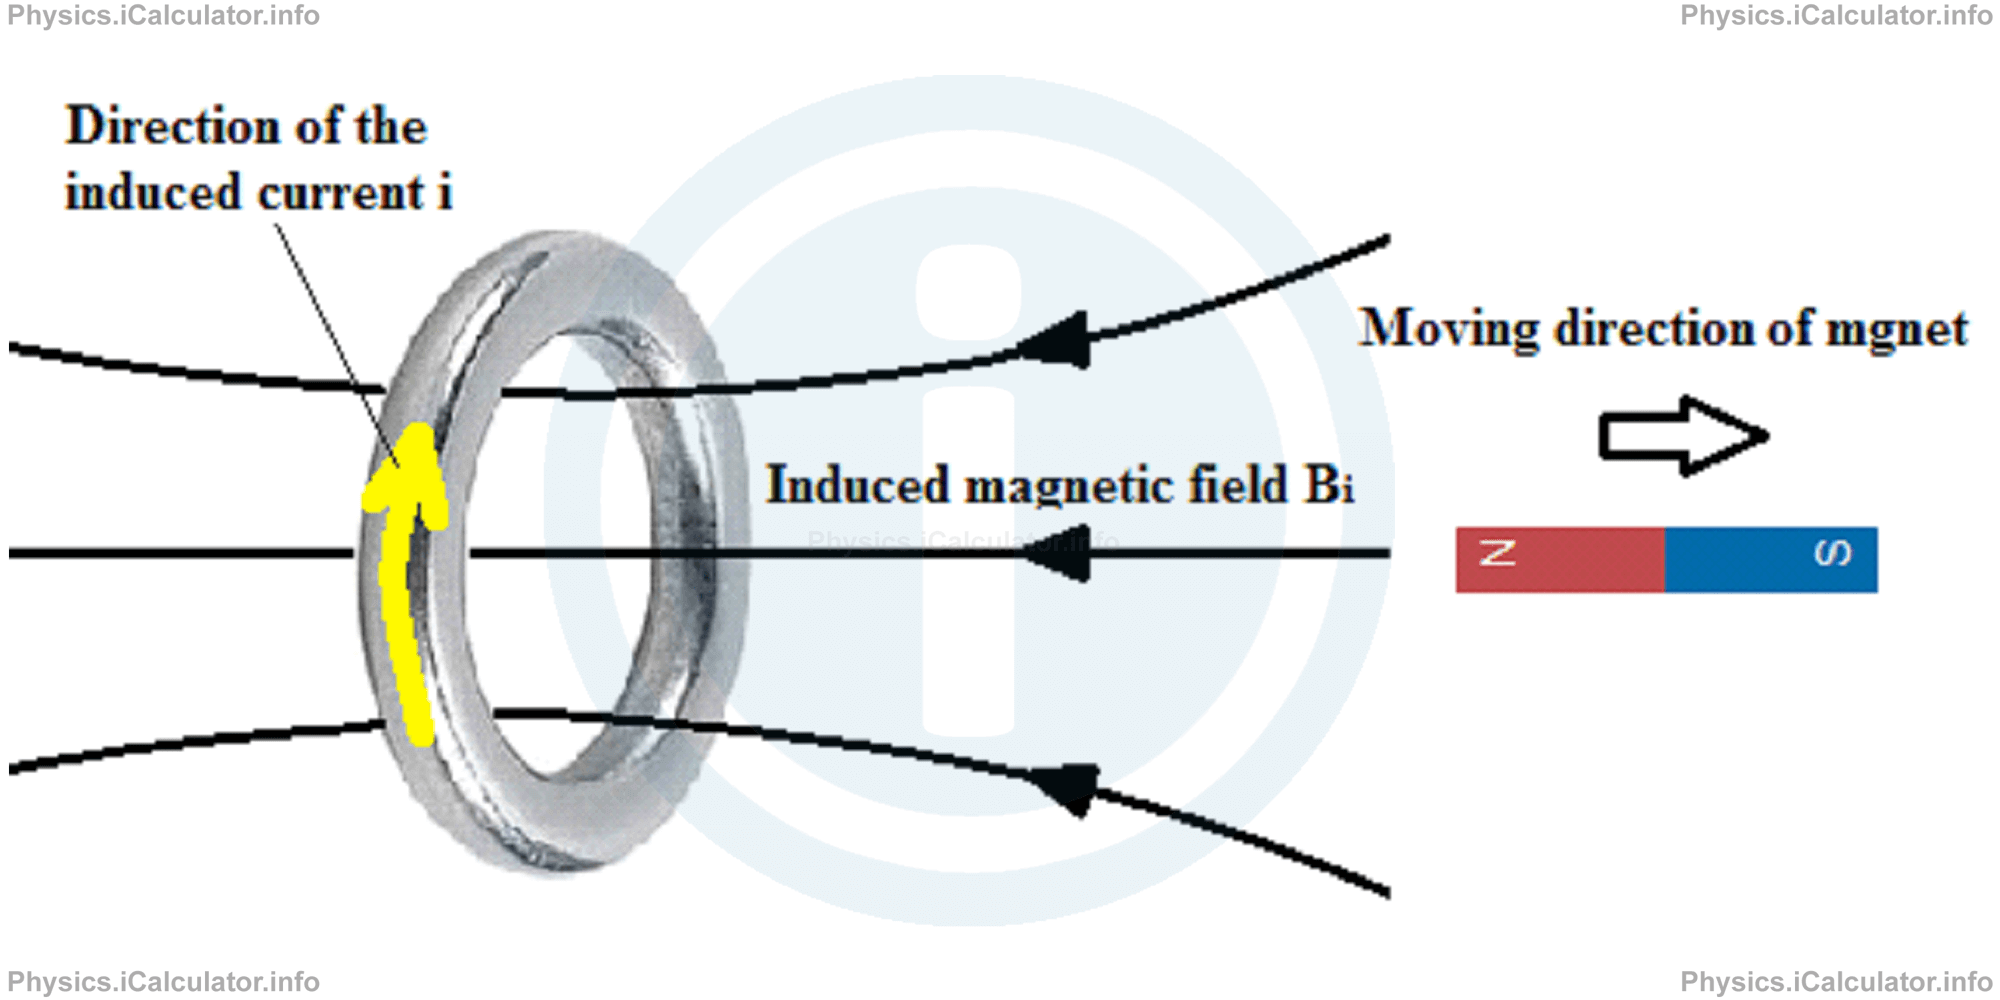
The magnetic flux in this case decreases with time as less magnetic field produced by the mar magnet enter the coil. As a result, an induced emf (and therefore an induced current) will appear in the coil based on the Faraday's Law. This induced current is in the opposite direction to before.
Example 1
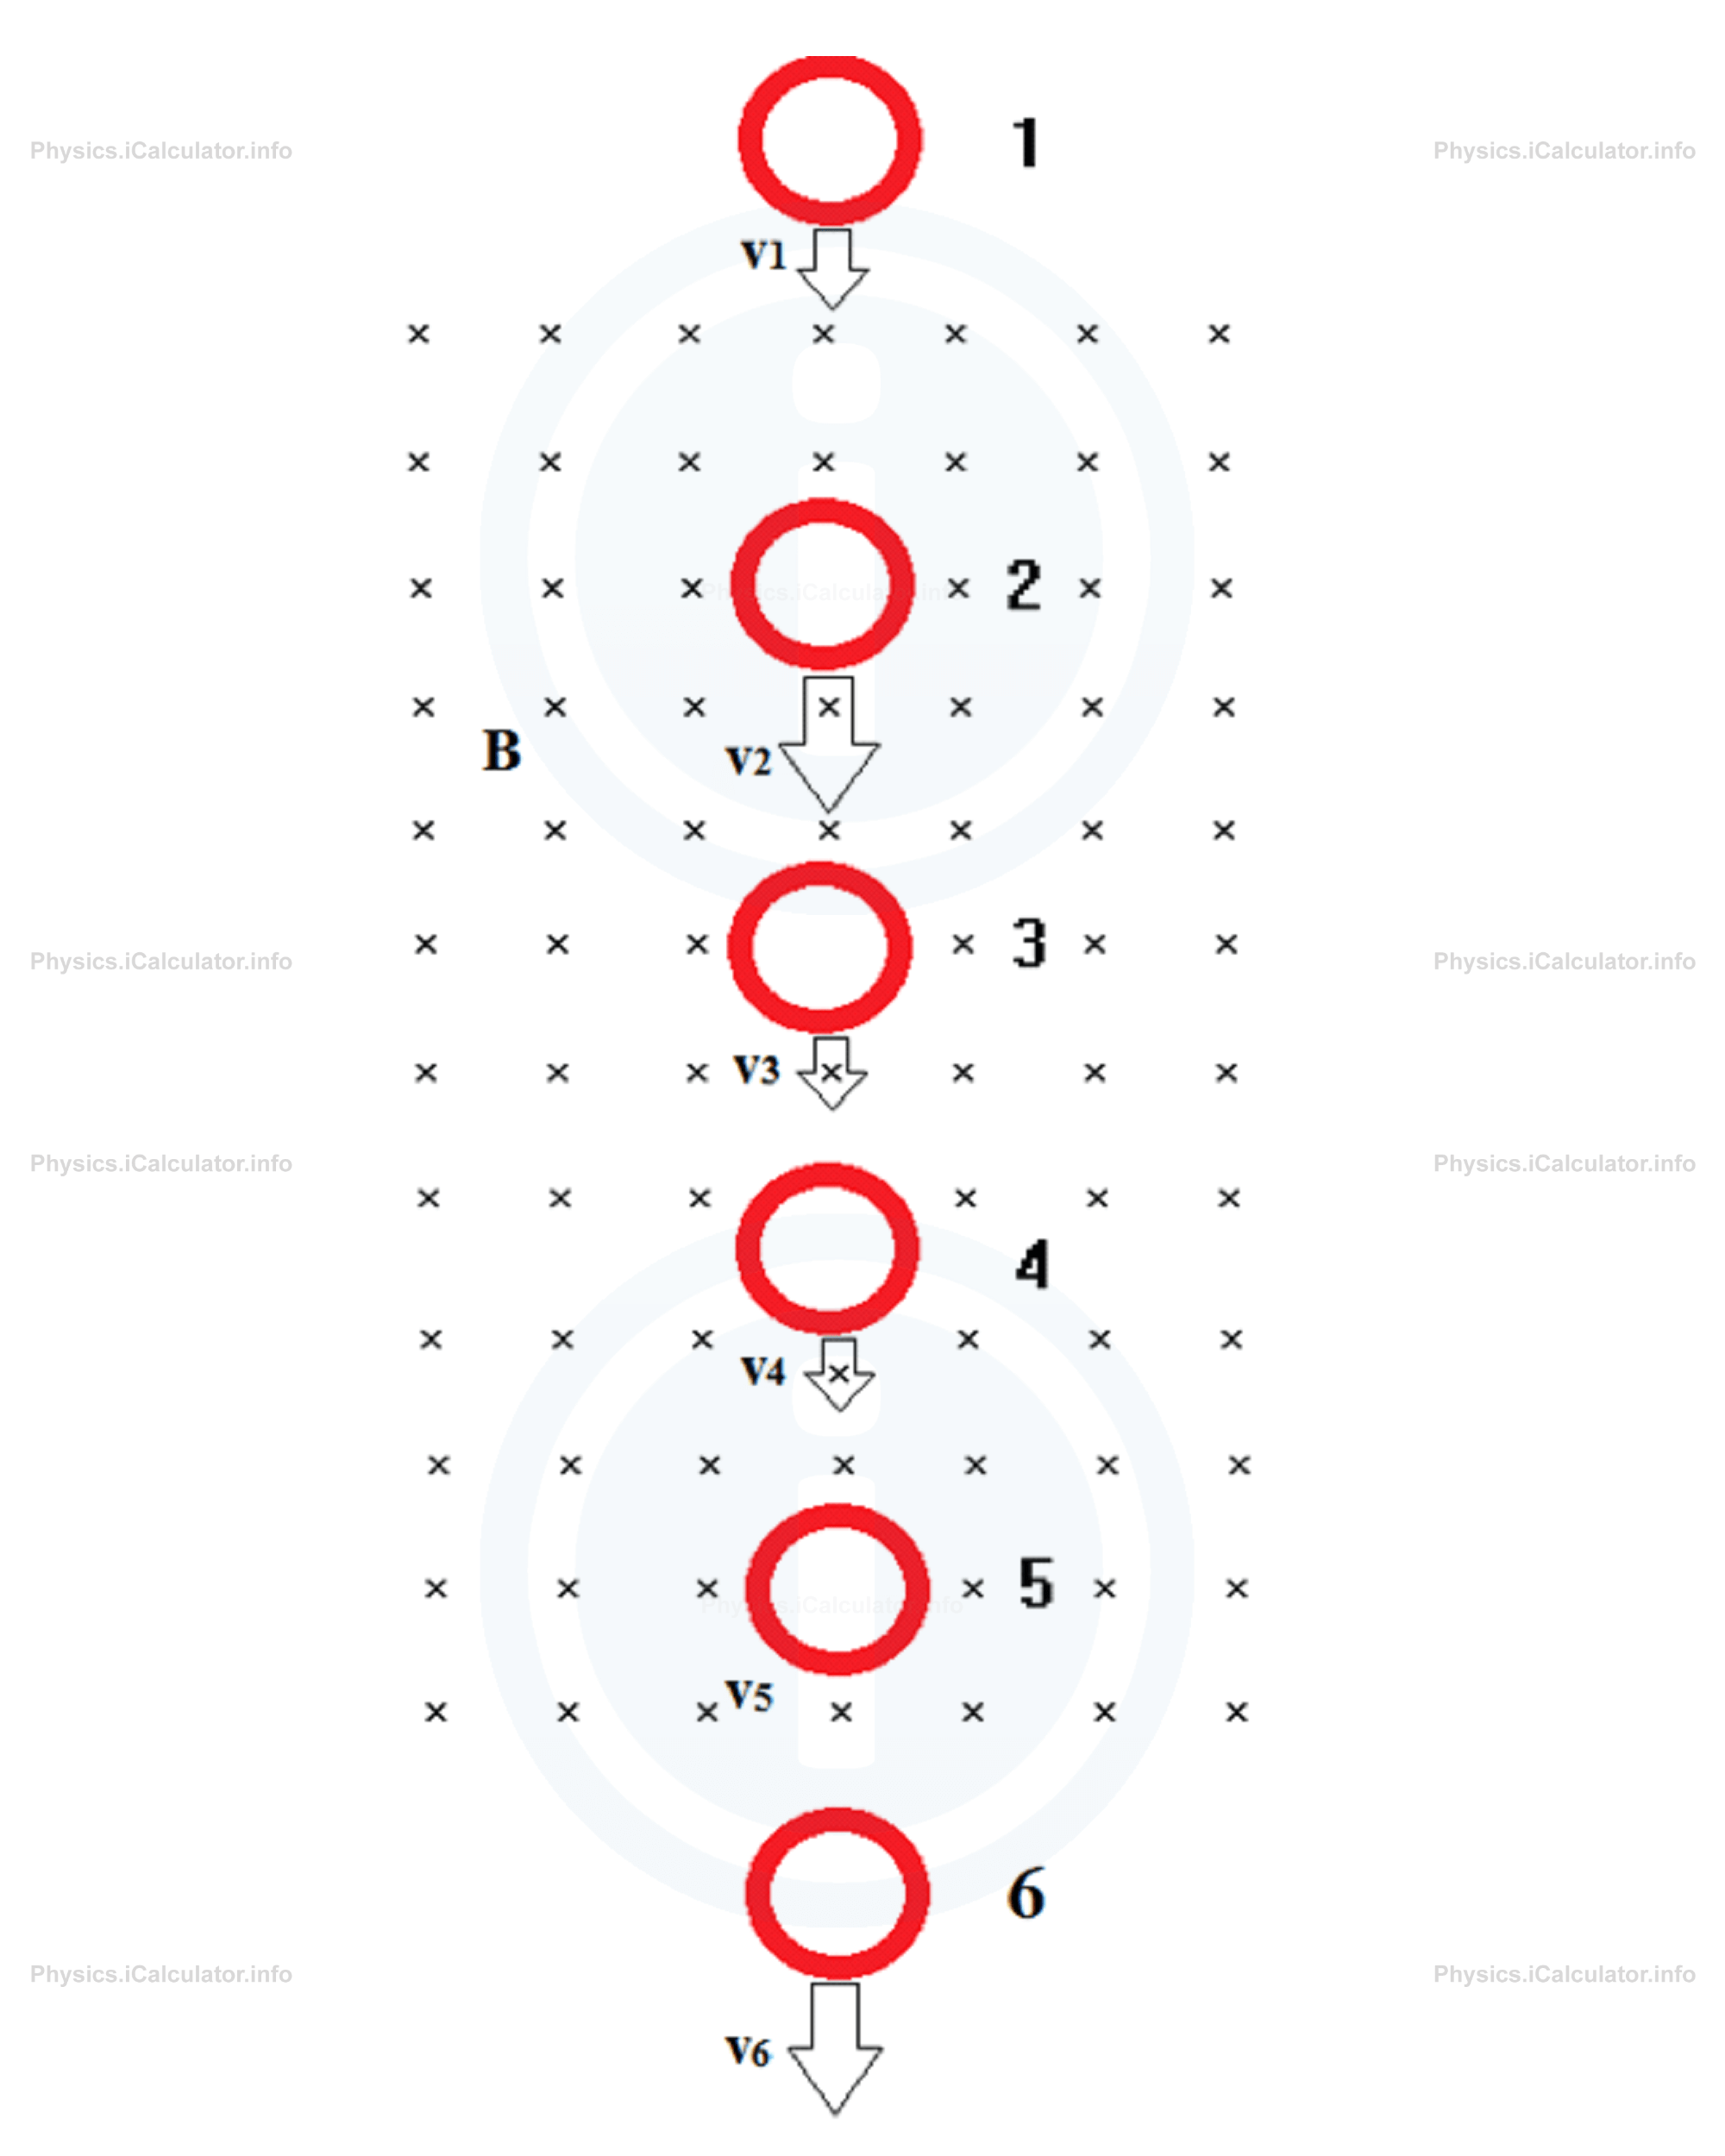
A copper coil is placed inside a uniform magnetic field where the plane of coil is normal to the field lines. A copper ring slides downwards from position 1 to position 6 as shown in the figure. Determine the direction of the induced current (if any) for each position.
Solution 1
- There is no induced current in the coil in the position 1 despite it is moving downwards. This is because the coil in outside the magnetic field. Remember, an induced current is produced only when a coil is moving in respect to an external magnetic field.
- The coil is increasing its velocity at the position 2. This means the number of magnetic field lines entering the coil is increasing with time, so the magnetic flux in the coil is increasing too (this is similar to when we move a bar magnet towards a coil as discussed earlier). Hence, the induced flux must be directed outwards since the external magnetic field is directed onto the page (inwards). In order to produce an outward induced magnetic field, the induced current in the coil must be in the anticlockwise direction (you can prove it using the right hand rule).
- The coil is moving slower than before in the position 3. This means the number of magnetic field lines entering the coil is decreasing with time, so the magnetic flux in the coil is decreasing too. Hence, the induced flux is directed inwards. The resulting induced current in the coil is therefore clockwise (use again the right hand rule to convince yourself).
- The coil is moving at constant velocity when it is in the position 4 (v3 = v4 as the arrows showing the velocity are identical in these two positions). Therefore, no flux change is occurring. This means no induced emf (and induced current) is being produced in the coil and ΔΦ = 0.
- In the position 5, the coil is not moving, so actually there is no induced current in the coil. (When moving from position 4 to position 5 there is a decrease in velocity, so the situation is similar to 3 (there is a decreasing flux which brings an inwards induced flux and a clockwise induced current in the coil).
- In the position 6, the coil is outside the magnetic field, so there is no induced current produced in the coil despite it is moving. This situation is similar to that described in the position 1.
Now, we can discuss a numerical example to make clear this point (how to apply the Lentz Law).
Example 2
A rectangular coil of area 0.4 m2 is placed inside a uniform magnetic field of magnitude B = 1.2 T. The coil rotates by 90° clockwise until it occupies a vertical position. This process takes 0.02 s. Calculate:
- The induced electromotive force on the coil
- The magnitude and direction of the induced current in the 12 Ω resistor.

Solution 2
- First, we have to calculate the magnetic flux in both positions. Thus, in the initial position (as shown in the figure), we have zero flux as the area vector and the magnetic field lines are perpendicular to each other. Hence, we have Φ1 = B ∙ A ∙ cos θ1When the coil is rotated by 90° clockwise, we have θ2 = 90°. In this case, the flux is maximal. We have
= (1.2 T) ∙ (0.4 m2 ) ∙ (cos 00 )
= (1.2 T) ∙ (0.4 m2 ) ∙ 0
= 0Φ2 = B ∙ A ∙ cos θ2Since there is a single turn in the coil (N = 1), we obtain for the induced emf produced in the coil during the given time:
= (1.2 T) ∙ (0.4 m2 ) ∙ (cos 900 )
= (1.2 T) ∙ (0.4 m2 ) ∙ 1
= 0.48 Wbεi = -N ∙ ∆Φ/Δt
= -1 ∙ 0.48 Wb-0Wb/0.02 s
= 24 V - The magnitude of the induced current in the resistor is calculated using the Ohm.s Law. We have i = εi/RThe direction of the induced current in the resistor is found by using the following reasoning:
= 24 V/12 Ω
= 2A
When the coil rotates by 90° clockwise, the magnetic flux in the coil increases. As a result, more field lines enter the coil from left to right (as this is the direction of the external magnetic field B). As a result, an induced magnetic field is produced in the coil due to the change in the flux. This means the direction of the induced magnetic field Bi is as shown below:
Using the right hand rule (when grasping the lateral sides of the coil, the four curled fingers show the induced magnetic field while the outstretched thumb shows the direction if the induced current) we find that the induced current flows through the resistor from right to left.
You have reached the end of Physics lesson 16.8.1 Lentz Law. There are 2 lessons in this physics tutorial covering Lentz Law, you can access all the lessons from this tutorial below.
More Lentz Law Lessons and Learning Resources
Whats next?
Enjoy the "Lentz Law" physics lesson? People who liked the "Lentz Law lesson found the following resources useful:
- Knowledge Feedback. Helps other - Leave a rating for this knowledge (see below)
- Magnetism Physics tutorial: Lentz Law. Read the Lentz Law physics tutorial and build your physics knowledge of Magnetism
- Magnetism Revision Notes: Lentz Law. Print the notes so you can revise the key points covered in the physics tutorial for Lentz Law
- Magnetism Practice Questions: Lentz Law. Test and improve your knowledge of Lentz Law with example questins and answers
- Check your calculations for Magnetism questions with our excellent Magnetism calculators which contain full equations and calculations clearly displayed line by line. See the Magnetism Calculators by iCalculator™ below.
- Continuing learning magnetism - read our next physics tutorial: Inductance and Self-Induction
Help others Learning Physics just like you
Please provide a rating, it takes seconds and helps us to keep this resource free for all to use
We hope you found this Physics lesson "Lentz Law" useful. If you did it would be great if you could spare the time to rate this physics lesson (simply click on the number of stars that match your assessment of this physics learning aide) and/or share on social media, this helps us identify popular tutorials and calculators and expand our free learning resources to support our users around the world have free access to expand their knowledge of physics and other disciplines.
Magnetism Calculators by iCalculator™
- Angular Frequency Of Oscillations In Rlc Circuit Calculator
- Calculating Magnetic Field Using The Amperes Law
- Capacitive Reactance Calculator
- Current In A Rl Circuit Calculator
- Displacement Current Calculator
- Electric Charge Stored In The Capacitor Of A Rlc Circuit In Damped Oscillations Calculator
- Electric Power In A Ac Circuit Calculator
- Energy Decay As A Function Of Time In Damped Oscillations Calculator
- Energy Density Of Magnetic Field Calculator
- Energy In A Lc Circuit Calculator
- Faradays Law Calculator
- Frequency Of Oscillations In A Lc Circuit Calculator
- Impedance Calculator
- Induced Emf As A Motional Emf Calculator
- Inductive Reactance Calculator
- Lorentz Force Calculator
- Magnetic Dipole Moment Calculator
- Magnetic Field At Centre Of A Current Carrying Loop Calculator
- Magnetic Field In Terms Of Electric Field Change Calculator
- Magnetic Field Inside A Long Stretched Current Carrying Wire Calculator
- Magnetic Field Inside A Solenoid Calculator
- Magnetic Field Inside A Toroid Calculator
- Magnetic Field Produced Around A Long Current Carrying Wire
- Magnetic Flux Calculator
- Magnetic Force Acting On A Moving Charge Inside A Uniform Magnetic Field Calculator
- Magnetic Force Between Two Parallel Current Carrying Wires Calculator
- Magnetic Potential Energy Stored In An Inductor Calculator
- Output Current In A Transformer Calculator
- Phase Constant In A Rlc Circuit Calculator
- Power Factor In A Rlc Circuit Calculator
- Power Induced On A Metal Bar Moving Inside A Magnetic Field Due To An Applied Force Calculator
- Radius Of Trajectory And Period Of A Charge Moving Inside A Uniform Magnetic Field Calculator
- Self Induced Emf Calculator
- Self Inductance Calculator
- Torque Produced By A Rectangular Coil Inside A Uniform Magnetic Field Calculator
- Work Done On A Magnetic Dipole Calculator