Menu
Physics Lesson 22.7.2 - Instruments Used for Observation of Sky
Please provide a rating, it takes seconds and helps us to keep this resource free for all to use
Welcome to our Physics lesson on Instruments Used for Observation of Sky, this is the second lesson of our suite of physics lessons covering the topic of Astronomical Measurements and Observations, you can find links to the other lessons within this tutorial and access additional physics learning resources below this lesson.
Instruments Used for Observation of Sky
Observation of the sky is based on the detection of EM radiation incident from sources that produce and emit it. Through various tool, we are able to detect some of this radiation and then process the data to draw the relevant conclusions including the position, temperature, age, size and many more properties of the stars and other celestial bodies.
People have observed the sky since antiquity yet only the frequencies of visible light have been analysed. It is a fact that EM frequencies include a much larger range of frequencies that those of radio waves to gamma radiation. As a result, despite the long-term attempts, only a small section of the sky (limited to the inside of Milky Way galaxy) has been observed until more modern devices were invented.
EM radiation incident from cosmos is absorbed from the Earths atmosphere. Experiments show that high frequency EM waves cannot penetrate the atmosphere. As a result, the harm caused by such waves is avoided. Without its' atmosphere, life on Earth would be impossible as high frequency EM waves would destroy all living organisms.
Observations of the sky are grouped into two main categories: observations made in the visible spectrum and those made in other spectra of EM radiation. We will explain both of them in the following paragraphs.
a. Observations made in the visible spectrum. Telescopes
The easiest type of sky observation is made using the naked eye. Obviously, there are limitations in this method including the inability to see beyond visible light frequencies and distances the human sight can extend to. Whilst the first obstacle is overcome only recently, the second one (limited sight) was been addressed centuries ago with the invention of the telescope - a magnifying tool used to see remote objects in the sky normally invisible to the naked eye. This is made possible, not by changing the frequency of EM radiation but, by magnifying the view offered in the sky. Telescopes range from the most basic (used to observe the Sun, Moon, and a few planets of the solar system) to the most advanced ones (built by governments of developed countries) that are used to observe the remotest parts of the visible universe.
The telescope, as a magnifying tool, first appeared in the Netherlands tn October 1608. The national government in The Hague discussed a patent application for a device that aided "seeing faraway things as though nearby." It consisted of a convex and concave lens in a tube. The combination magnified objects three or four times. The government found the device too easy to copy and did not award a patent, but it voted a small award to Jacob Metius and employed Hans Lipperhey to make several binocular versions, for which he was well paid. The telescope and binoculars design has effectively remained the same since their initial conception.
The most convenient telescopes used to observe remote stars are known as "mirror telescopes". The diagram of a mirror telescope is shown in the figure below.
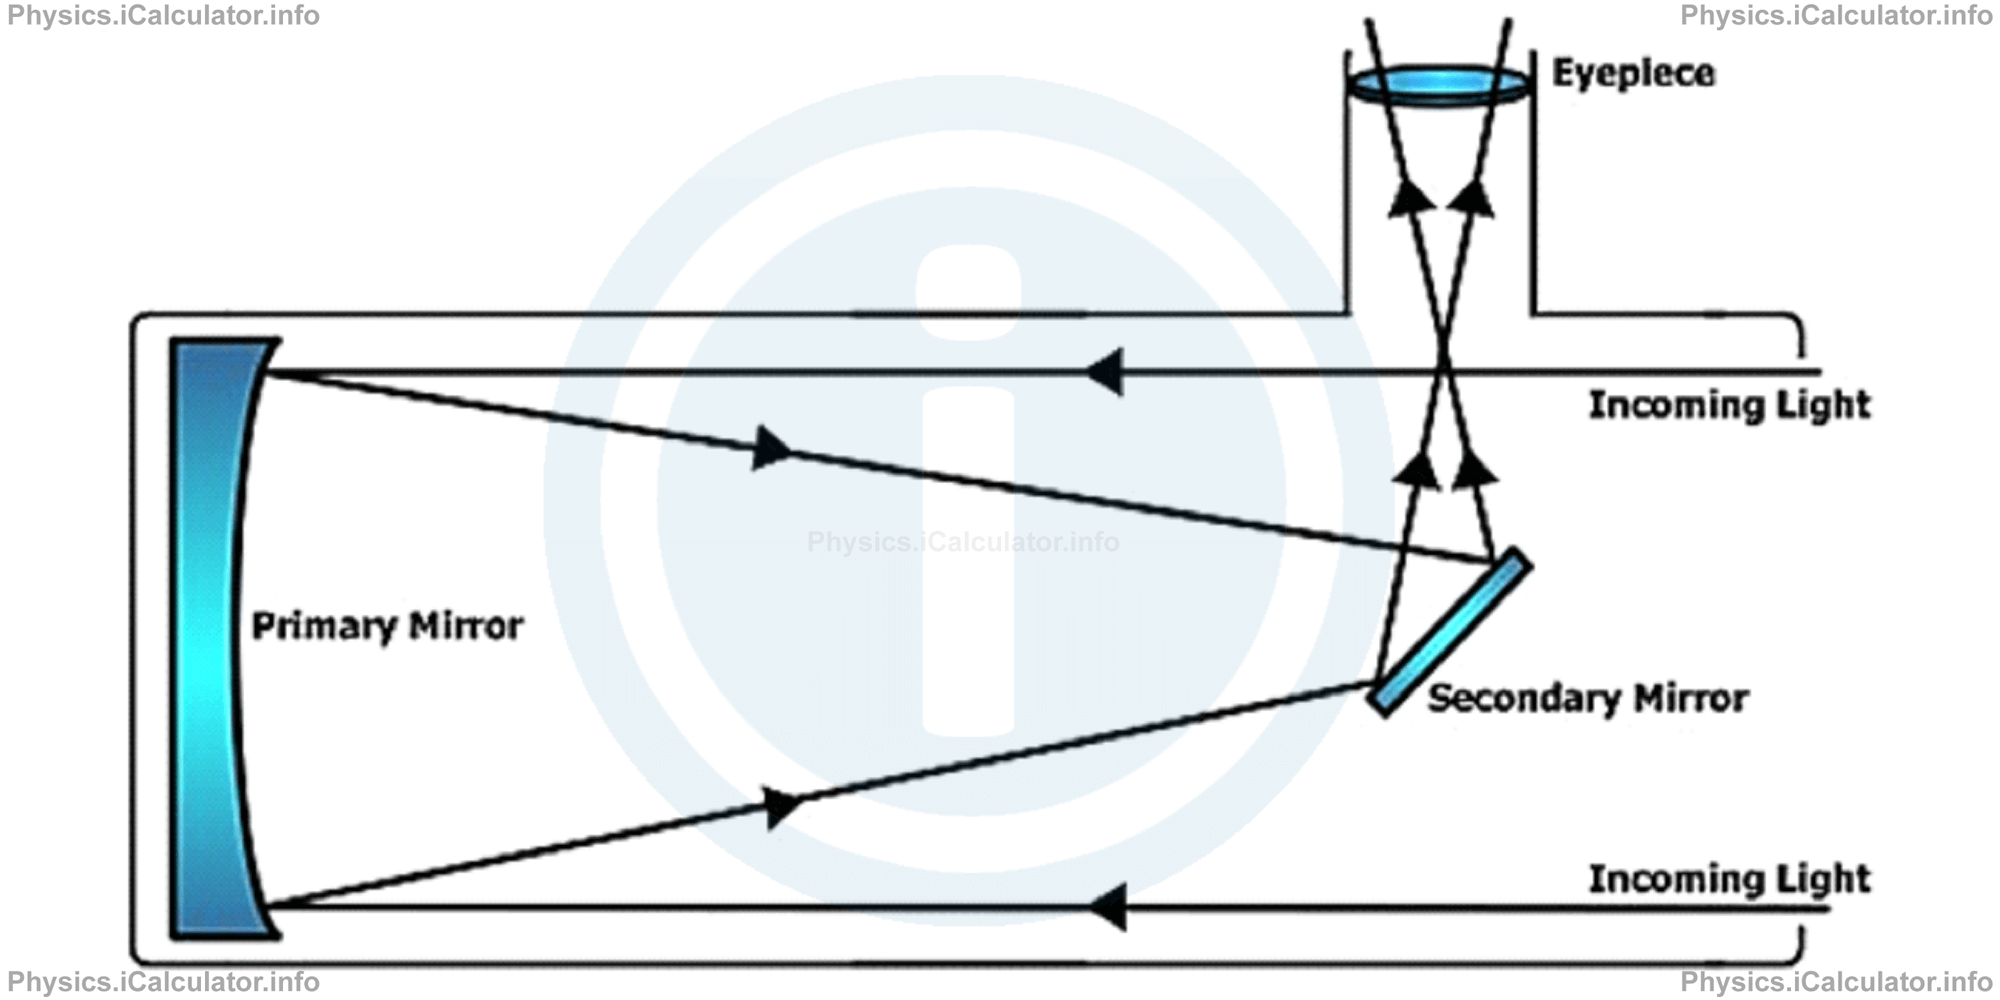
The mirror relescope diagram illustrates that light rays are incident from a very large distance (almost from infinity) on a big dimensions concave mirror. As a result, the image produced will be at focus on this mirror. A plane mirror is placed slightly before focus to divert the reflected rays to a converging magnifying lens (eyepiece). In this way, a clear and magnified image is obtained. Newton was the scientist who invented the mirror telescope.
The reason why mirrors are preferred to lenses is that mirrors do not have aberrations (image distortions caused by different thicknesses at the various points of a lens). Hence, we always obtain a sharp image when using mirrors instead of lenses.
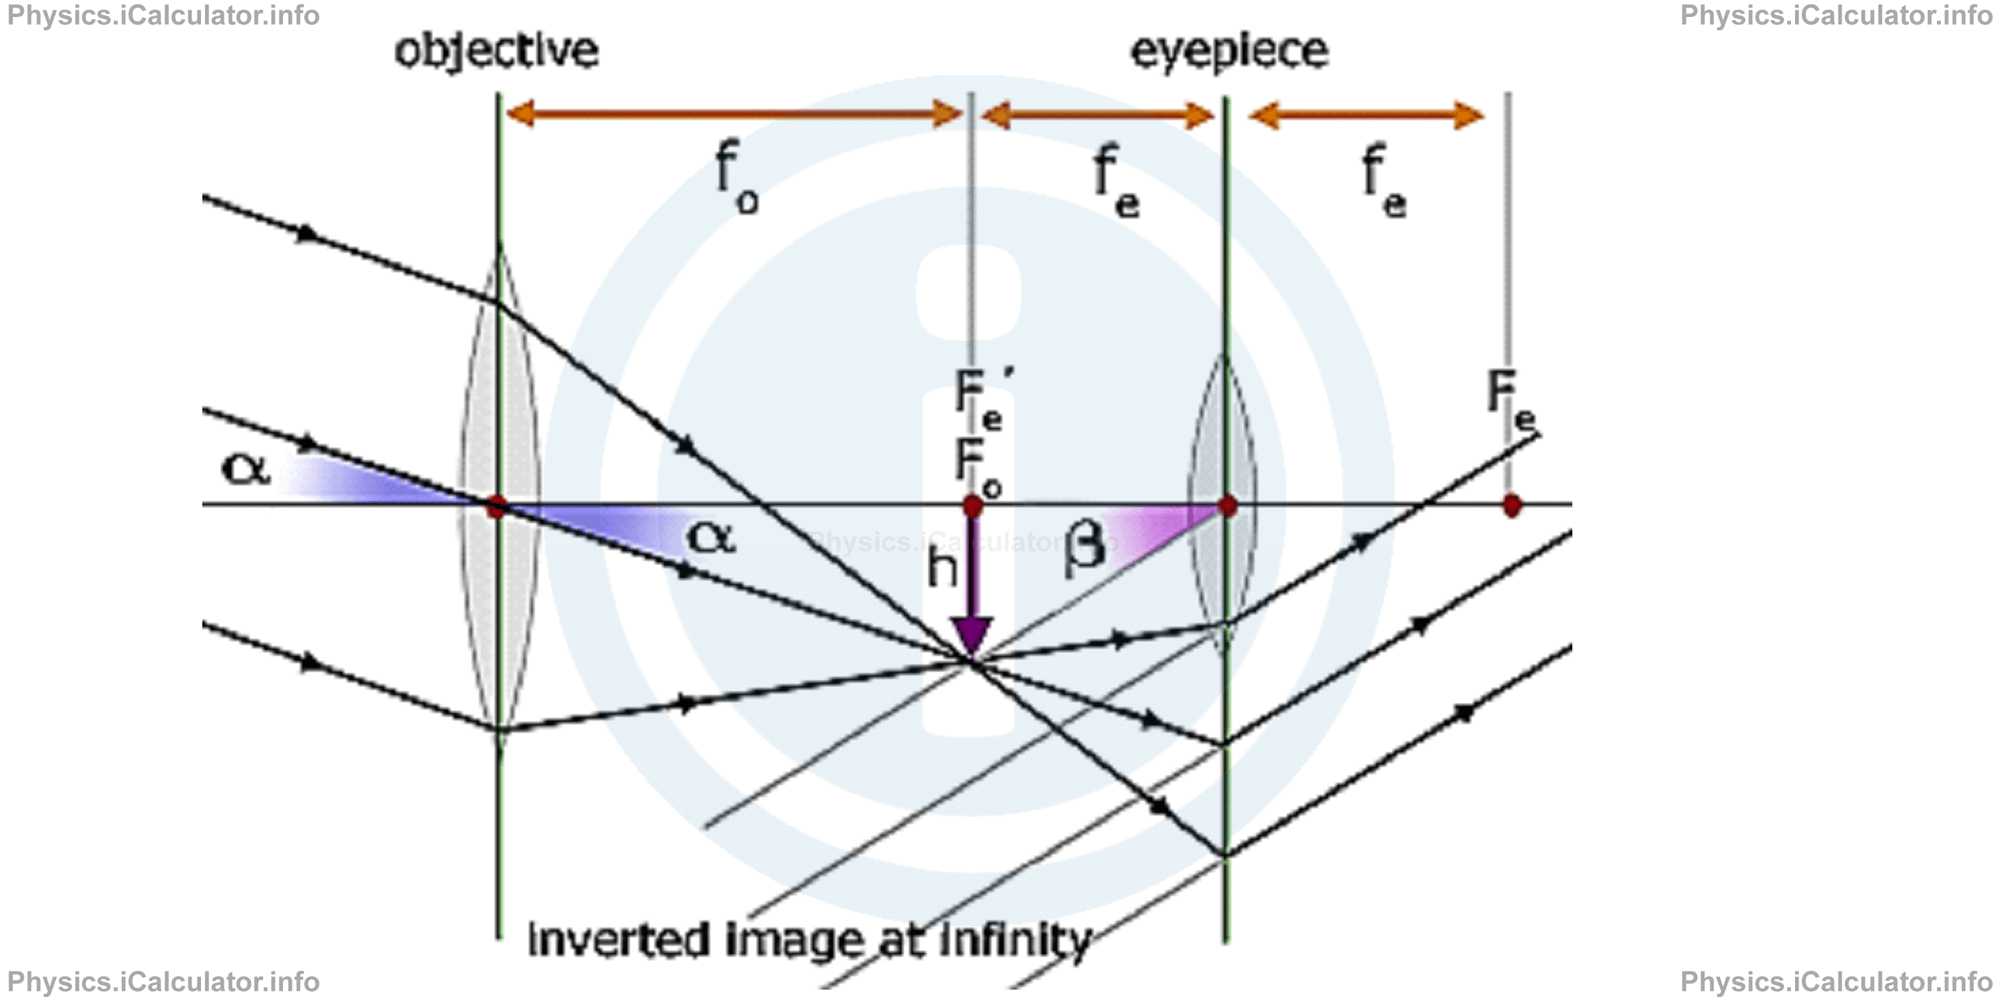
The lens telescope is made of two main parts: objective (the lens in which the original rays from the object fall first) and eyepiece (the lens on which we see the image). These two lenses are positioned in such a way that the image produced by the object falls slightly before the focus of the eyepiece. From the known formula (see Section 12):
where d0 is the distance of the image produced by objective which acts as an object for the eyepiece, di is the distance of final image from the eyepiece and F is the focal length of the eyepiece, we can find the position (and height if we want) of the original object. The operating principle of lens telescope is very similar to that of binoculars, for which we will solve an example now.
Example 5
A single eye monocular has a length of 20 cm. The objective has a focal length of Fo = 12 cm and the eyepiece has a focal length of 10 cm. An object is placed at 40 m away from monocular. Calculate the magnification produced.
Solution 5
First, we must calculate the position of the image in respect to the objective that later will be considered as the object for the eyepiece. Given that do = 40 m = 4000 cm, we obtain for the first part of solution
1/4000 + 1/di = 1/12
1/di = 1/12 - 1/4000
1/di = 1000 - 3/12000
1/di = 997/12000
di = 12000/997
di = 12.0361 cm
This image (that acts as an object for the eyepiece) has a distance of
= 7.9639 cm
from the eyepiece. Hence, we obtain for the position of final image in respect to eyepiece
Substituting the known values, we obtain
1/df = 7.9639 - 10/79.639
1/df = -2.0361/79.639
df = -79.639/2.0361
df = 39.11 cm
Magnification M is obtained by dividing df and di. We have
= 39.11 cm/7.9639
= 4.91 times
We must note that this result only represents the magnification in length. The true magnification is 2 dimensional (as we see objects in 2 dimensions when using one eye). Hence, the true (or total) magnification Mt of this monocular is
= 24.1 times
Telescopes are produced either to observe the sky directly or to generate images. When capturing images, a camera is placed at the eyepiece of the telescope instead of the viewers eye.
Telescopes are usually placed on a fixed support (for example on a tripod) to avoid vibrations and obtain a fixed, sharp and stable image. Moreover, no celestial body remains in a fixed position so it is necessary to change the position of the telescope every a few minutes. For this reason, the moveable base of large telescopes is designed to move in the opposite direction to that of the Earth. This approach esnures that the image remains visible via the eyepiece of the telescope for a long time.
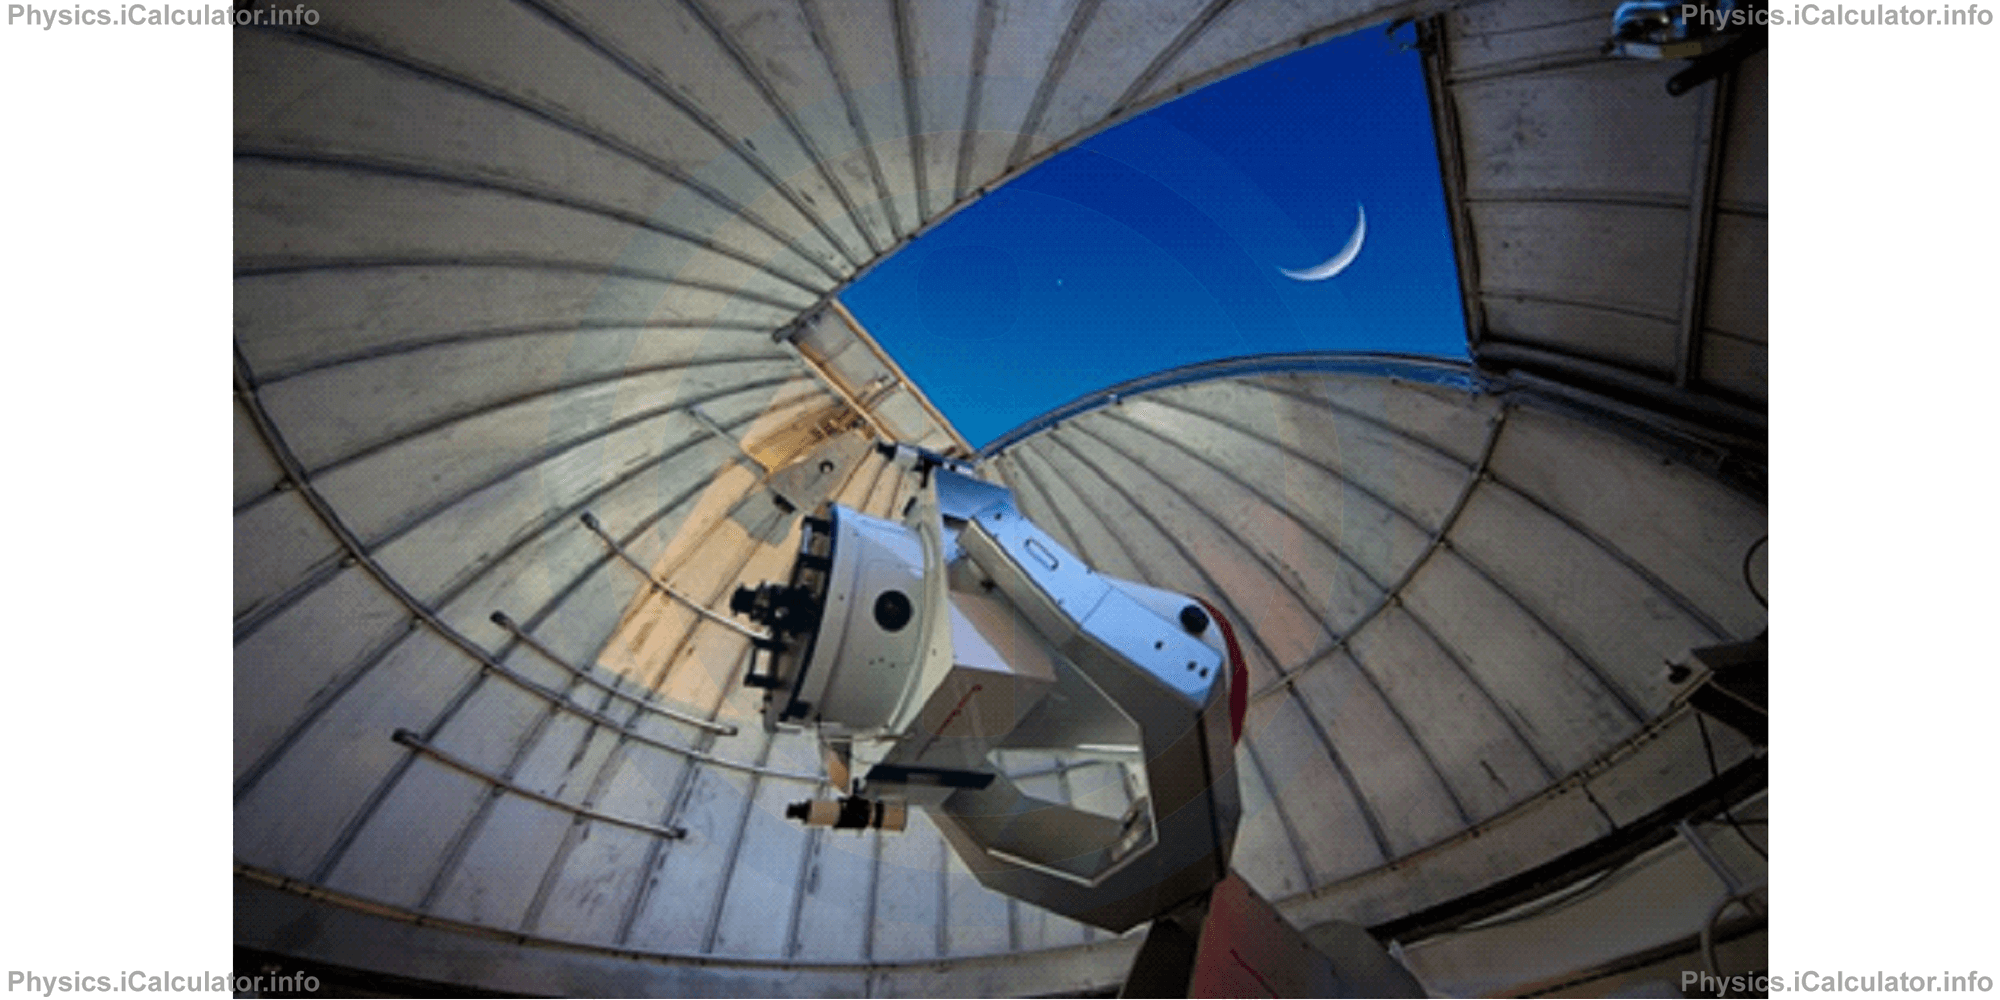
Powerful telescopes are placed inside observatories, these are buildings which typically have half-spherical glass roofs called domes. Telescopes are placed on rotatable tracks and the glass window on the spherical roof is also moveable. This is done to protect the telescope from weather conditions and to obtain a realistic image of the sky. The photo below provides a good example of on of these telescopes observing the Moon.
b. Observations made in other frequencies of EM radiation
Celestial bodies experience physical phenomena that occur in other EM spectra besides visible light. Consequently, modern tools developed over the past 120 years have been designed to obtain information by means other than direct observation. They act as "windows" that connect us to the world of invisible EM waves including radio waves, IR, UV, X but also gamma radiation.
The first sub-branch of astronomy operating in radio frequencies is known as "radio-astronomy". It was developed between 1932-1936 and allows scientist to study solar photosphere as well as other celestial phenomena. Telescopes that operate at radio frequencies are known as "antenna", in analogy to antennas which are used to receive radio waves in communication.
"Infrared astronomy" was developed during the 1960s. It manifests more technical difficulties than radio-astronomy and is therefore more complicated. The first difficulty arises due to the fact that infrared telescopes must be raised up to the top layers of the atmosphere using balloons or artificial satellites. Second, they must be very cool, close to absolute zero to avoid disturbances caused by the interference of IR radiation originating from the cosmos in addition to that emitted by the telescope itself. IR telescopes allow us to observe interstellar dust and clouds in a given galaxy.
The other types of astronomy based on the study of invisible EM waves use satellites to raise telescopes above the atmosphere to avoid disturbances caused by environmental factors. Today there are UV astronomy, X-rays astronomy and Gamma rays astronomy - all sub-branches developed after the 1960s. Thus, the study of UV spectrum allows us to analyse the spectra of many chemical elements that form various celestial bodies including stars and galaxies. X-ray astronomy detects very hot regions and the environment between two stars that move in pairs, where one of them is a white dwarf, neutron star or black hole. This sub-branch of astronomy is the key factor that allows us to identify black holes in the universe. Gamma astronomy on the other hand, deals with very energetic processes in the universe that are able to emit high frequency radiation. For example, gamma explosions (named so due to their very short interval of occurrence) occur very frequently in the universe are analysed through gamma astronomy to identify the factors causing these explosions and thus, understand better how the universe works.
You have reached the end of Physics lesson 22.7.2 Instruments Used for Observation of Sky. There are 3 lessons in this physics tutorial covering Astronomical Measurements and Observations, you can access all the lessons from this tutorial below.
More Astronomical Measurements and Observations Lessons and Learning Resources
Whats next?
Enjoy the "Instruments Used for Observation of Sky" physics lesson? People who liked the "Astronomical Measurements and Observations lesson found the following resources useful:
- Instruments Feedback. Helps other - Leave a rating for this instruments (see below)
- Cosmology Physics tutorial: Astronomical Measurements and Observations. Read the Astronomical Measurements and Observations physics tutorial and build your physics knowledge of Cosmology
- Cosmology Revision Notes: Astronomical Measurements and Observations. Print the notes so you can revise the key points covered in the physics tutorial for Astronomical Measurements and Observations
- Cosmology Practice Questions: Astronomical Measurements and Observations. Test and improve your knowledge of Astronomical Measurements and Observations with example questins and answers
- Check your calculations for Cosmology questions with our excellent Cosmology calculators which contain full equations and calculations clearly displayed line by line. See the Cosmology Calculators by iCalculator™ below.
- Continuing learning cosmology - read our next physics tutorial: Orientation in the Sky and Constellations
Help others Learning Physics just like you
Please provide a rating, it takes seconds and helps us to keep this resource free for all to use
We hope you found this Physics lesson "Astronomical Measurements and Observations" useful. If you did it would be great if you could spare the time to rate this physics lesson (simply click on the number of stars that match your assessment of this physics learning aide) and/or share on social media, this helps us identify popular tutorials and calculators and expand our free learning resources to support our users around the world have free access to expand their knowledge of physics and other disciplines.